InGenius rings in over 50 Enterprises with InGenius Connector Enterprise for Open CTI
Customers in over 10 countries have selected InGenius Connector Enterprise for Open CTI as their Click-to-Dial and Screen-Pop solution for Salesforce.
Today, InGenius Software announced that they have successfully installed over 50 customers with their InGenius Connector Enterprise for Open CTI solution. InGenius Connector Enterprise is server-based Computer Telephony Integration solution, designed to connect existing enterprise phone systems with the enterprise Salesforce instance – all with absolutely no desktop software required. InGenius Connector Enterprise provides users with an easy way to make, receive, and automatically log calls from within Salesforce while also providing business managers with accurately captured and instantly available call center report data. InGenius is demonstrating InGenius Connector Enterprise for Open CTI in Booth #W234 at Dreamforce.
“With no desktop install required, we turn up a high reliability solution for our clients in under an hour,” says Dale Gantous, CEO at InGenius. “Our solution combines a server-based architecture, an extremely rich and intuitive user interface, and the ability to work with all the leading enterprise PBXs. That’s why customers have been flocking to InGenius Connector Enterprise for Open CTI.”
Product Key Features
InGenius Connector Enterprise is a server based product that resides at the customer site to capture every call within Salesforce. For use in Sales Cloud, Service Cloud, and Salesforce Console, this revolutionary CTI product leverages Salesforce’s new Open CTI platform to provide users with outbound click-to-dial, in-bound screen-pop, automatic call logging, call wrap-up codes, agent log in and more.
Since calls are automatically logged, call records are accurately captured and instantly available for detailed reporting, giving managers a real-time insight into call center operations. InGenius Connector Enterprise is a true enterprise call center solution.
InGenius provides Salesforce customers running Cisco, Avaya, Mitel, or Asterisk PBX systems, or Broadsoft or Mitel hosted VoIP services, with a highly reliable, scalable, clientless CTI solution that runs in any browser and on any machine. InGenius Connector Enterprise is helping Salesforce users around the globe achieve positive impacts on their call center productivity.
Get on the phone!
There have been a couple of interesting articles lately about the things startups can and should do to get and keep customers, and to build loyalty.
In particular I thought that this article – (Dial up: Why startups should use the phone) was interesting, and highlights something we try to do at InGenius.
We definitely use the phone here at InGenius – we call potential customers as quickly as possible when they contact us, and we walk every customer through installing and configuring the software (which takes about an hour in most cases), and help them get up and running. We’ve found that this personal touch really makes a difference and starts to build a bond of trust between our customers and ourselves.
Another recent post by Paul Graham (Do things that don’t scale) and 37Signal’s Jason Fried’s excellent post highlight the same ideas – get out there and get in touch with your customers!
Displaying BinaryCanary.com Web Site Status on a Geckoboard
Our company uses Geckoboard.com to display the status of a ton of Salesforce.com related information, as well as info we pull from Trello.com, Fogbugz.com, and BinaryCanary.com.
BinaryCanary.com is a website monitoring company that allows us to monitor all our online properties, and alerts us if there are any issues. BinaryCanary.com has an API that we can query to determine the status of each of our monitors.
We wrote a small PHP script which is polled by Geckoboard.com every 3 minutes, and checks the status of all our online properties. The returns a simple XML file, which is then displayed by Geckoboard.com in a text window.
We are able to use simple HTML like <table> and <font> to make the text display green for sites that are up, and red for any sites that are down.
The widget isn’t very pretty, but it packs a ton of information into a small space, and we can easily see any sites that are red. (Sorry, I had to blank out some of the text…)
Here’s the PHP file we use to generate the XML for this widget.
And, the Geckoboard Widget settings are:
Adding a phone number field to Salesforce.com Opportunities
We recently had an InGenius Connector Enterprise customer who wanted to have clickable phone numbers associated with each opportunity. By default, opportunities don’t have any phone number fields.
The customer’s workflow was that they wanted their workers to go through the opportunities, and call each one every few days, until the sales was closed.
The Solution:
We advised the customer to add a field to the opportunity of type “Phone.” We called this field “Account Phone.” Since this field is of type “Phone,” it will automatically be converted to a “click-to-dial” field by InGenius Connector Enterprise.
We then added a trigger to the Account that detects any changes, and then loops through all the opportunities associated with this account, and updates the “Account Phone” field in all the opportunities.
This way, the opportunities all have a clickable phone number field that stays in sync with the phone number field in the Account.
The Trigger Apex Code:
trigger UpdateOpportunityPhoneField on Account (after insert, after update) {
  // Loop through all account updates in this trigger (there will generally be one)
  for(Account acct: Trigger.new) {
    List<Opportunity> oppList = [SELECT id, Account_Phone__c FROM Opportunity WHERE Accountid = :acct.id AND Account_Phone__c != :acct.Phone]; // Find all the opportunities for this account.
    for(integer i = 0 ; i < oppList.size(); i++){
      oppList[i].Account_Phone__c = acct.Phone; // Update all opportunities with the new phone number.
    }
    update oppList;
  }
}
Things to be aware of:
- The solution uses some Apex code to accomplish its magic. You’ll need an appropriate Salesforce.com subscription to use this solution.
- The code loops through all the Opportunities each time an Account is changed. This could use up your Apex allowance.
- If the user edits the Account Phone field in the Opportunity, this is not copied back up to the Account. You could add a second trigger for this, if needed. If the user edits the Account Phone field, the changes will be wiped out the next time the Account is edited. Another alternative is to make the Account Phone field read-only in the Opportunity Layout.
InGenius Software Announces InGenius Connector Enterprise for Salesforce.com Open CTI
September 18, 2012 at Dreamforce, InGenius Software announced their new Enterprise CTI solution, InGenius Connector Enterprise for Salesforce. InGenius Connector Enterprise for Salesforce is the first click-to-dial software solution for Salesforce.com built using the new Salesforce.com Open CTI interface. With no desktop install, InGenius Connector Enterprise for Salesforce, streamlines call dialing and inbound/outbound logging activities for an entire organization. InGenius Connector Enterprise for Salesforce, will be available directly from InGenius Software at http://www.InGenius.com or by calling 613-591-9002 x3000.
InGenius Connector for Salesforce is fully integrated with Salesforce.com to enable several features including incoming call screen pop, click-to-dial, and automatic call logging all from within the Salesforce.com user interface. Additionally, InGenius Connector Enterprise provides automatic field population and configurable templates for fast, accurate logging of all calls against Salesforce.com records. Since InGenius Connector Enterprise for Salesforce utilizes the new Salesforce Open CTI, it requires no desktop install and can be used on both PC (Windows) and Mac (OS X) and accessed from any browser (Chrome, Mozilla Firefox, Internet Explorer).
InGenius Connector for Salesforce, is installed on premises at a customer site and connects directly with the customer’s resident telephony system. InGenius Connector Enterprise interoperates directly with the telephony system and does not require any additional hardware or software products to be purchased or installed. Initially being released for Cisco’s Call Manager, InGenius Connector Enterprise for Salesforce works with several telephony platforms including Cisco Unified Contact Center Enterprise (UCCE), Cisco Unified Contact Center Express (UCCX) and Avaya.
Rich Loen, InGenius Software’s CTO says, “InGenius Connector Enterprise makes it very easy for an organization to add click-to-dial and logging functionality for all its Salesforce.com users. The server based install is very quick and eliminates the time and effort associated with visiting every desktop during deployment. This makes enterprise wide roll-out for different platforms very efficient.”
Check out the press release here: http://www.prweb.com/releases/2012/9/prweb9901527.htm
InGenius Connector for Salesforce: How to stop those annoying Internet Explorer pop-up messages
Are you getting annoying pop up messages in Internet Explorer when you use Salesforce? Does Internet Explorer ask you if you want the best website builder? That’s a whole lot of extra clicking! If you would like to avoid this pop up, you can make a change in Internet Explorer’s Internet Options.
For this change, we’ll be changing the Internet Explorer security settings to Enable the display of Mixed Content on the page. You may want to check in with your network administrator before you make this change.
To edit the Internet Explorer security settings:
1) Open Internet Options in your Internet Explorer browser. You can do this from the icon in the top right (shown below).
2) Select the Security tab at the top of the window.
3) Select Internet (we’ll also have to do this for each of the four ‘zones’ displayed), click the Custom level.. button.
4) Scroll about halfway down the list until you see the Display mixed content setting.
5) Change to Enable. This should fix the problem – however, you can also continue on to edit the same settings for Local intranet, Trusted sites, and Restricted sites, if you want to really make sure it doesn’t happen anymore.
The image below will help you find the locations I mean:
InGenius Connector How-to: setup Windows telephony location and dialing rules
InGenius Connector can create and manage it’s own dialing rules, but it also relies on the Windows Telephony Location rules to tell it how to dial. You can set these rules up in “Phones and Modems” on your Windows Control Panel, or directly from a link in InGenius Connector’s configuration window.
If you do not see the checkbox beside “Use Windows Telephony Location” where the arrow points in the image above, that means you are not an administrator on your computer and this option is already automatically checked off for you. Click on the “Edit” button encircled (ensquared?) in red above.
Clicking the “Edit” button will take you to the “Phone and Modem” dialogue box on the left. If you do not see an area code and location that matches your current location, click “New” to set it up. If it’s there, or once you’ve created your location, click “Edit.” This will bring you to the window on the right of the image above. Double check your settings, and make sure that all of the right numbers are in the yellow highlighted box. For example, I have “9”s there to access a line outside of my office network. You probably also want to make sure that “Tone” dialing is selected. Finally, click the “Area Code Rules” tab at the top of this window.
Clicking on the “Area Code Rules” tab at the top the of the “Edit Location” screen on the left of the image above will let you define rules for a specific area code. For example, if you want to make sure that your local area code is always dialed, you would select/create the area code from the window on the left, and then click “Edit.” This will open the Edit Area Code Rule window on the right of the image above. Make sure these settings are to your liking, and then click “OK” on all of the windows you’ve opened.
As a final test, you can open up the InGenius Connector settings window and navigate to the “Dialing Rules – Advanced” screen, as shown above. Type in the number you want to dial in the highlighted field above, and make sure the number that appears in the “Dialed number:” box is what you want to see.
If you are located outside North America and need to use our country-specific dialing rules, this screen is also where you have the option to select different dialing rules, or to import new dialing rules.
Finally, if your dialing rules queries are still unanswered, or if you want to know even more, you can read about Advanced Dialing Rules on our Knowledge Base: http://bugs.ingenius.com/default.asp?W19. Warning: Advanced dialing rules look scary.
InGenius Connector version 3.2: New Release Announcement
I mentioned in a previous post that we’d released a new version of InGenius Connector for Salesforce on Cisco platforms. In the meantime, we’ve also released InGenius Connector for Microsoft Dyanmics CRM on Cisco platforms, and now our newest version is available across all of our phone platforms and CRMs.
Among other things, our new version of InGenius Connector includes:
- Support for Salesforce call center adapter in Firefox and Chrome
- Tons of new features in our Microsoft Dynamics CRM integration
- Support for Cisco platforms
We think you’ll love the new features. Take a look and test it out with a free trial!
Salesforce Call Center tips: Display Call Duration in Minutes
In this post we showed you how to add Call Duration to a Salesforce Activity page. Unfortunately, the only existing field available for you to add and display on your Activity page gives you call duration in seconds. That might work just fine for you and your organization, but some of our users wanted to display call duration in minutes. Here’s how to do it.
As the Salesforce Administrator, navigate to Setup-> Customize-> Activities -> Add Custom Fields.
Select New:
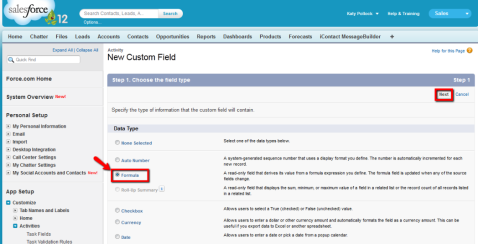
Select Formula for your data type and then click Next:
Enter in the name you would like to give the field (Sarah used “Call Duration(Min)” here. Then select Text and then Next:
Click Advanced Formula and then copy and paste the text below this image into the highlighted space shown below. Once you’ve pasted it, click Next:
IF((MOD(CallDurationInSeconds/60,1)*60) > 10,
TEXT(FLOOR(CallDurationInSeconds/60)) + “:0” + TEXT(FLOOR(MOD(CallDurationInSeconds/60,1)*60) ))
Select the profiles you wish to be able to see this field. Finally, click Save.
Navigate to a task and you should now see “Call Duration (Min)” displayed on that task page. Cool!
In the image above, you can now see that we’ve got two Call Duration Fields; one displays duration in seconds (we showed you how to display in this post) and one outlined in red that displays call duration in minutes (this is the custom field we just created).
If you’d also like to see this field on your Contacts’ Activity History page, then you’ll need to customize the Contact Page Layout. Stay tuned for more!
InGenius Software Webinar Series
We will be starting our InGenius Connector CRM Webinar series this week on Friday May 11 at 11am EST! Anyone who wants to see our software in action can sign up here: http://go.ingenius.com/webinars.
The first webinar will show you InGenius Connector for Salesforce. Our Product Marketing Specialist and Salesforce wiz, Sarah, will show you how the application makes the job of sales agents and managers easier.
Check back in to our InGenius Connector CRM Webinar series regularly!
InGenius Connector for Salesforce Call Center CTI and Cisco – in Firefox and Chrome!
We’ve released support for our InGenius Connector Salesforce plugin on Cisco platforms, and we couldn’t be more pleased about it! This solution is exciting for two reasons,
1) It supports Cisco Call Manager and,
2) It makes use of Salesforce call center version 4.
What does that mean? The InGenius Connector for Salesforce and Cisco works in Firefox and Chrome in addition to Internet Explorer!
We know how happy this will make all you Firefox and Chrome users, and we want to let you know that multi-browser support for InGenius Connector and Salesforce on our other platforms (such as Broadsoft, Mitel, Polycom, Aastra, Asterisk and softphone) is also coming very soon.
To try out InGenius Connector for Salesforce and Cisco Call Manager, visit our website and download a free trial.
Receive desktop notifications for voicemail with InGenius Connector Softphone
To make sure that you always see your softphone voicemail notifications, navigate to the Advanced settings in your softphone profile:
Click on the General Settings tab in the Advanced Softphone Configuration Window:
Once you fill in the required information, you’ll be able to access your voicemails from the desktop! Sometimes Windows hides these notifications in the systray. To make sure that you always see your InGenius Connector notifications, you can do the following:
Click on the little upward facing arrow in the Windows system tray and select Customize…
From here you can select which icons you want to always see in the systray. If you ‘show icon and notifications’ for InGenius Connector, you will always see whether or not you have voicemails waiting for you:
Let us know if this was helpful, or if you have other questions!
Salesforce Call Center Tips: Add Call Duration to your Activity Page
One of our users asked how to add the call duration field onto their activities page. We thought it could be helpful for others too.
To add the call duration field onto your Activities pages, you’ll need to log into Salesforce as a Salesforce Administrator.
Navigate to YourName-> Setup-> Customize-> Activities.
Select Task Page Layouts and then look for “Call Duration” at the top of the Task Page Layouts screen. You can then drag “Call Duration” down to an open spot on the Task Page, and shuffle things around until you get a layout you like. Make sure you press Save at the top of the “Console Interation” space.
Navigate to a lead or contact page where you already have call activities, or create a new call activity by making a test call. Open up the Task page, and look to find your “Call Duration” field
You should now see a Call Duration field on your Task page! The Call Duration will be populated by seconds.
You can use these steps to add any available fields onto to the Task page. To check what fields you have available, navigate to YourName-> Setup-> Customize -> Activities-> Task Field. You can add any of these fields into your Task page. If there are additional fields you need on your Task page, check out how to create Customized Fields in Salesforce.com
Salesforce Call Center Tips: Manage your screen pops
If you’re using our InGenius Connector for Salesforce, you are familiar with “screen pops” – the automatic navigation to the lead or contact who is calling in. This can be really helpful, but you may not always want incoming calls to pop to a different Salesforce screen – or – you might just want the pop to open in a new window or tab. This post will show you where to make changes to your Salesforce screen pop settings.
As usual, when you want to make changes to the Salesforce call center, you must log in as the Salesforce Administrator, or have your Salesforce Administrator make these changes for you.
 Navigate to Setup-> Customize -> Call Center.
Usually, we go into the Call Centers tab shown above. This time we’ll click on the Softphone Layout option
 Select Softphone Layouts, and then click through the “Introducing Salesforce CRM Call Centers” splash page if it appears.
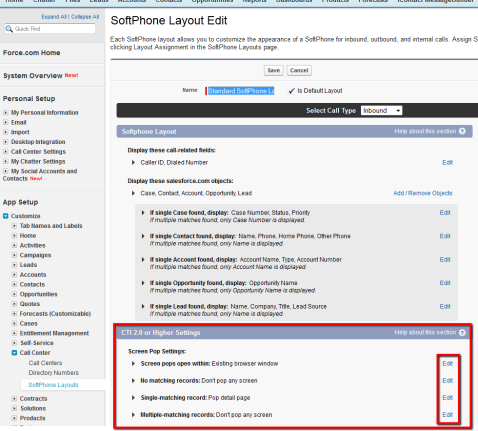
On the SoftPhone Layouts page, click on Edit next to the Standard SoftPhone Layout option, or whichever Softphone Layout is selected as “Default”.
Scroll to the bottom of the page below the heading “CTI 2.0 or Higher Settings.” This is where you can make changes to the screen pop settings. Click on Edit next to any of the settings to see your options, and test out some different configurations to see which works best for you!
From the support desk: Adding licenses and profiles
Maybe your trial license has expired, maybe you are adding a softphone profile, or maybe you’ve decided to add a new CRM integration. Whatever the case, we get lots of questions about what do when when you’ve got a licensing issue. This post will help you out.
To add a new license:
Once you’ve received your license from InGenius Software by purchasing through our store, requesting a free trial, or writing in, you just plug it into the following spot:
It is a good idea to restart the application at this point. If you’ve entered in a license for a CRM plugin, once you restart InGenius Connector, you’ll need to configure or log onto the CRM.
If you’ve entered a license key for a new phone profile, you’ll need to create a new profile.
To create a new profile:
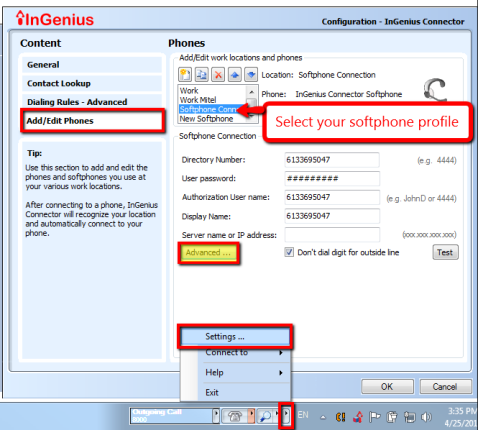
Navigate to Settings->Add/Edit Phones in the InGenius Connector toolbar, then click the icon with the yellow sun.
This will bring up a New Profile box where you need to name your location profile and select your phone model from the drop down menu:
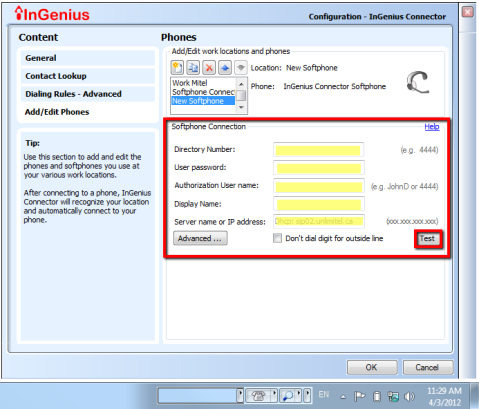
Fill in the information on the configuration page. You may need contact your network administrator for some of these details:
Once you press Test a log box will open. This log box gives you a message to let you know whether you are successfully connected, or if you need to double check some of your information:
When you see a “Successfully Connected” message, you’re all set!
InGenius Connector TAPI plugin
O-Zone Tech created this great video on using our InGenius Connector TAPI plugin across a variety of CRM packages:
Thanks O-Zone Tech!
You’ll notice that O-Zone Tech is using the TAPI plugin with Aastra Connector. There is similar functionality across all of our supported phone profiles.
The TAPI plugin is one of our most popular products because it can work with any TAPI enabled CRM. TAPI means Telephony Application Programming Interface. It lets you connect your phone (or softphone) and computer to talk to other phones. Neato! If you aren’t sure whether your CRM has TAPI, you can check with us or with your CRM‘s support group.
Features of our InGenius Connector TAPI plugin include click-to-dial from inside your CRM, screen pops on incoming calls that have a matching record, and call logging. These features vary somewhat depending on the CRM you’re using, so get in touch to test it out with a free trial!
InGenius Connector for Microsoft Dynamics CRM – in Houston!
It’s trade show season and starting this weekend, the InGenius Team is off and running. First up is Convergence 2012, the Microsoft show that starts this weekend in Houston. InGenius will be at booth 2416 to show off our updates to the InGenius Connector for Microsoft Dynamics CRM plugin. In case you aren’t going to make it to Houston, or if you want a sneak peak, here’s what we’ll have in store:
Updates to InGenius Connector for Microsoft Dynamics CRM have made it a very easy install. All that is required is some phone profile information depending on the type of phone or server you are connecting to, and your Microsoft Dynamics CRM credentials.
All of the telephony control features that make your CRM so much more usable are available in InGenius Connector Microsft Dynamics CRM plugin. There’s click to dial on all stored numbers in your MSCRM leads and contacts:
… Record pops on an incoming call …
… Call control and note taking space for inbound and outbound calls …
… And automatic logging in the contact record history, and in the reports!
We’re really pleased with the updates to InGenius Connector for MSCRM and thrilled to be showing at Dynamics 2012. If you aren’t in Houston for the show, stop by our website for more information or get in touch for a free trial!
We’re Winners!
That’s right, our InGenius Connector for Salesforce made us the winner of TMC Net‘s 2011 Unified Communications Product of the Year Award. Good for us!
Give one of our AWARD WINNING InGenius Connector CRM integrations a try! We offer free 15-day trials of our integration products and we are happy to walk you through the setup and installation process. Thanks for the prize TMC Net!
Add Users to the Salesforce Call Center
This is another post related to optimizing your Salesforce call center. Adding users to the Salesforce call center is pretty standard stuff – it’s covered in our PDF help guides as well as on the Salesforce website itself. I thought I’d toss it up here just so everything is together.
Like the other edits we’ve made to the Salesforce call center, you must be a Salesforce Administrator or have Administrative privileges on the call center in order to make these changes.
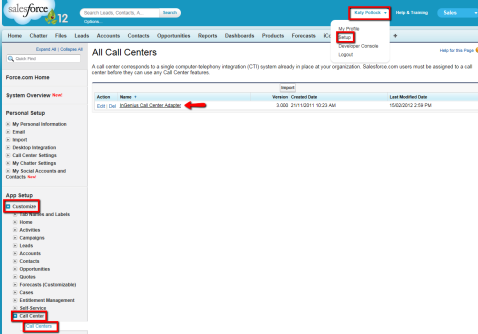
First, navigate to Your Name –> Set up –> Customize –> Call Center –> Call Centers and click “Continue” if it appears. You will now be on the All Call Centers Page and by this point, you will see the InGenius Call Center Adapter listed. If you don’t, get in touch and we’ll send you a free trial.
Click on the InGenius Call Center Adapter and then scroll to the bottom of the page and select Manage Call Center Users. Here, you will see a list of users who have already been added to the InGenius Connector Call Center, if there are any. A user’s name must appear in this list in order to use the Salesforce call center.
If the name is not listed, don’t panic! Simply click Add More Users and then search for your user by setting the fields to ‘Name” or “Full Name” etc., and then “equals.” I find this search page a bit difficult, so if your user’s name doesn’t pop up at first, try fiddling with the search fields.
Once you successfully located your user, select their name and click “Add”.
That’s it!
Clone the Salesforce Call Center
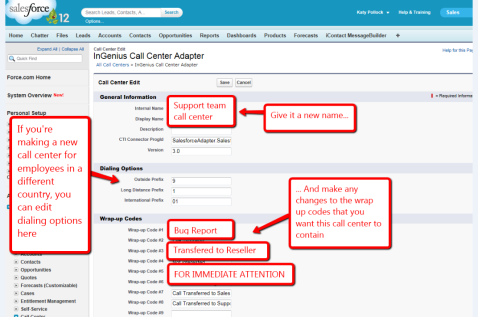
Now that you know how to make changes to the call center wrap up codes in Salesforce, you might find yourself with a long list of wrap up codes. Maybe you got code happy and are deciding to pare it down, or maybe you really need all of those options for the various groups in your office. If this is the case, you can clone the call center to give different people different call wrap up code options.
Cloning the call center means that you create a duplicate version of the InGenius Connector for Salesforce call center. You’ll then have two (or however many clones you create) call centers that can be customized to fit the different needs in your office.
To clone the call center, you’ll have to be a Salesforce Administrator. Just like in the last post, you’ll navigate to Your Name -> Setup -> Call Center -> Call Centers -> Continue (if it appears):
Click directly on the InGenius Call Center Adapter link. This will open up the InGenius Call Center Adapter page. At the top of this page you can select the options to Edit, Delete or Clone the Call Center. If you clicked on Edit, you could customize the call wrap up codes. This time however, you’ll click on Clone.
This will bring you to a new screen with a new call center, containing all the same information as the original call center. Give it an internal name, and then proceed with any customizations to your clone.
Hit Save and you’ve done it! Now you have TWO call centers with different customized wrap up codes and you can select which of your Salesforce call center users are added to the different call centers. Documentation on how to add users to the call center in our PDF Salesforce Integration Administrator Guide, but I’ll also post it here next time as well.
Thanks everyone – hope your March is off to a stellar start!


